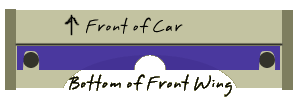
Here is the skinny on this little project.... Creating this Mini-Z version of the 2002 British American Racing Formula 1 car started as kind of a test project and turned into a major re-creation. I had a broken and battered McLaren body that was replaced with a fresh new one and so I thought I would see how tough it would be to do some custom livery creation since I have not done it before. Well about a week later I had a pretty close representation of the BAR 2002 Formula 1 race car. Since I started with a McLaren body, it really isn't technically correct as far as body architecture goes. I did borrow (hopefully I do not have to return it since I stripped the paint and cut it down) the barge boards from a buddy's ferrari that were a bit more technically accurate. Here is a limited summary of what I did exactly and since I didn't think it would go very far I was not documenting the process as I went along. Now I'm challenged with the task of trying to figure out all of the things that I've done to make this happen. Step 1: Body preparation from the busted up McLaren shell. My first major challenge was to try and reinforce and repair the front wing which had certainly seen better days. It was cracked completely in half just to the right of the mounting point and so that needed to be addressed. The mounting point to the nose cone was also broke and in the case of the McLaren this was originally a glue joint rather than screwed on like the Ferrari or Williams. To repair this I made a trip to the hardware store and picked up some of their thin little brass strapping material. This is the stuff from those little displays that you always look at and think it looks cool but what would you use it for. It was 1/4 inch by 1/32 inch thick. I cut it just long enough to fit the entire width of the front wing. I then cut out slots to fit around the bumper mounting holes and another slot to gain access to the screws that mount the nose to the rest of the car.
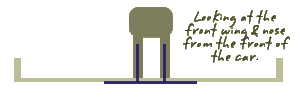
This repair proved to be a very strong fix as I did race with this for quite a while until I ended up replacing the whole body. The next challenge was attaching the wing back to the nose cone. I ended up creating another plate that had 2 pins soldered to it. These pins slid into holes that I had to drill in the 2 vertical supports that separate the nose cone from the wing. These pins and the plate were also epoxied into place and clamped to let dry.
You know all this may seem like a bit of a micky mouse fix but it is definitely stronger than new and it allowed me to make use of this already trashed body. Step 2: Stripping the paint and prepping the body for paint I read a great little article that compared different methods of paint stripping and pointed me into the direction of Castrol Super Clean for stripping paint and removing the old decals. This stuff was really worth its weight in gold! I soaked the body overnight in a container of Super Clean and after a thorough rinsing with water the paint just washed off. The more stubborn areas came off easily with minimal effort of some 0000 steel wool. What was left after this was a perfectly clean bare plastic body. However, in hind sight, I would strip all of the parts before making the repairs if necessary listed above. It seems as thought the Super Clean softens and breaks down the epoxy glue that was used above. The body was then washed and rinsed with water and allowed to thoroughly dry. Step 3: Priming and painting The body was primed with 3 coats of lacquer primer and allowed to dry overnight. Rough spots were wet sanded with 800 grit sandpaper and the body was washed and allowed to dry again. Paint was applied with... and I hate to say it.... Krylon from Walmart. This stuff actually worked pretty good but I wouldn't use it again. It seemed to spatter out rather than spray out and I could have done a much better job with some real model paint. I sprayed about 5 or 6 VERY light coats of white Krylon concentrating on the hard to get at first then the larger areas. While this was allowed to dry (approximately 1 week), I started working on the decals. Step 4: Creating and Acquiring the Decals I started scouring the Internet for any help in getting the decals for this car. I lucked out in finding a pdf file for converting a 1:18 scale model to the full tobacco sponsorship. This file was opened in Adobe Photoshop and re-scaled for a 1:25 scale Mini-Z. The rest of the sponsors were mostly acquired from their web sites or from the image search at Google. Step 5: Detail Painting and Decal Application Some features were hand painted from reference photographs that I printed from many of the formula 1 sites that offer photos taken at the circuits throughout the year. Jacques helmet and driver character for that matter were hand painted. The front wing end caps, inside of exhaust towers, inside of intake and rear wing side panels were also hand painted. The decals were printed on laser decal paper that I purchased from Bel Inc. I purchased both clear and white paper as the decals for the end plates on the rear wing and the Bridgestone decals on the rear wing had to have white lettering. Since most printers have no way of printing White on the clear sheets you can use the white decal paper. Application of the decals was pretty straight forward. I used as many photos as I could get my hands on for reference but for the most part followed the photo on the front page of this site. I did mess up on the 555 logos up on the intake and have them reversed (left one on the right and right one on the left side). The helmet visor that was on the tobacco conversion sheet also did not work out too well when scaled to the 1:25 scale. I will clear coat the whole thing after everything is allowed to thoroughly dry and cure. I also in the mean time need to test the clear coat that I have on a test piece to make sure the colors will not bleed. Well that is pretty much the end to a very long story. I hope that many of you could learn from my experiences and if you have any questions please email me. |

